Search Suggestions
Categories
Products
View All Results
Search Suggestions
Categories
Products
View All Results
Once you've changed your car engine oil once, you'll wonder why you've not been doing it yourself this whole time.
Every keen home mechanic starts somewhere, we don't all jump in at the deep end changing a gearbox or doing an engine conversion, most people start with a humble car engine oil change. An oil change is a simple part of a service you should be doing to your car annually or around every 10,000 miles (Your vehicle handbook should provide exact service intervals), it's something you can do yourself to save a bit of money plus isn't too overwhelming when it comes to spanner skills.
There is a small range of tools that you'll need, however consider them as an investment as it could be the foundation of a tool kit that will grow and regularly save you money on car maintenance as your skill set also increases.
*It's also advisable to use relevant safety equipment such as work gloves and goggles / safety glasses
**This is for Sump Plug which is commonly 17mm but can be different for each vehicle so please check
Make Sure your vehicle is parked on a secure and flat surface, like a drive way, make sure the hand brake is firmly applied.
Run your car engine for approximately 5 minutes to warm the oil, this will help with the draining. Whatever you do, DO NOT let your vehicle get up to full temperature, it will make the oil dangerously hot plus components like your exhaust will become scalding to touch.
While your running your engine it might be a good time to take a note of your mileage so you will know when its next oil change is due.
Time to get the front of your car in the air! A handy tip before you start is to check if you can see your sump plug under your car and work out which side will offer you the easiest access to it, once you've worked that out we'll begin the process of jacking up that side.
Start by chocking as many wheels as possible, the wheel diagonally opposite the jack will take most of the lifting pressure*. Now locate the correct manufacture recommended jacking point (consult handbook) and slowly raise the car from the ground ensuring the jack is always at a 90° angle from the body of the car and nothing is slipping or moving in a dangerous manner.
Once the front side is raised, ALWAYS support it with at least one axle stand, making sure it's in an appropriate place (check handbook for manufacture recommendations) so to not damage your vehicle.
*An example would be, if I'm jacking the front near side up, the rear off side will take the most pressure.
Locate the sump plug / oil plug, normally it's located back centre of your sump. Place your oil drip tray below the bolt, expect the first few gushes of oil to be projected forward slightly so adjust drip tray if need be.
Loosen sump plug with a spanner / socket set, then unwind the remainder by hand, take the last few turns slow and remove the plug. Find a safe place to store the sump plug for a few minutes.
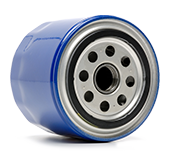
Normal Spin on Oil Filter:
Now locate the Oil filter*, grab your oil filter wrench and firmly rotate / loosen it in a anti-clockwise motion. Once able to, remove the wrench and finish removing the filter by hand, expect more oil to drain when the seal is broken and remember the filter will have a fair amount of dirty oil in it... so try not to spill it.
Grab the new oil filter and lubricate the seal with fresh oil, locate and clean with a cloth the filter fixing point that you've just removed the old one from. Being careful not to cross thread, your new filter should spin on freely in a clockwise rotation, no need for the filter wrench just tighten firmly by hand.
*If your oil filter means you've got to adjust the drip tray location away, simply pop the sump plug back in, only at finger tightness to stop the flow of oil.
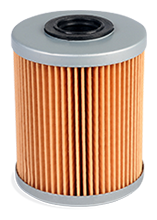
Cartridge Paper Element Oil Filter:
Locate the Oil filter housing, normally cartridge filters are accessible from the top side of the engine, sometimes in a isolated location away the engine block. Remove the top cap, use a filter wrench if required but sometimes this type will have a bolt fixing on top for you to simply remove with a spanner. Once you've got the assemble out, the old oil filter will either pop off or rotate off of the top cap. Before you reach for the new oil filter, clean the top cap with a clean cloth and the filter housings thread in the engine bay. If your top cap has a replaceable O ring, now's the time to swap it out for the new one.
Installing the New oil Filter is as simple as pop or rotate (same as removal) fit into the top cap, lubricating the top O ring of the top cap and Bottom O ring on the filter (if present) with fresh oil and screwing it back into the housing while being careful not to cross thread, once you've tightened the top cap all you can by hand you should nip it tight with a spanner / filter wrench... don't overdo it though.
This is a nice and simple, time to take the vehicle off the jack & axle stands* so the vehicle's nice and flat, allow gravity to finish the last bit of the oil drain into the drip tray. Give this about 5 minutes or as long as it takes to not have any flow of oil from the sump plug, it helps if you remove the top fill cap as well to allow any air pressure to be released.
Once you happy that oil is drained, safely jack the car back up and apply the axle stands as you did in step 2 and slide the drip tray out.
*If you put the sump plug back in to move the drip tray, now is the time to remove it and re adjust the drip tray.
If you've a new sump plug or a new crush washer it's time to fit them now, once your happy, it's time to tighten the sump plug to the correct torque setting (recommended by your vehicle manufacturer) and clean any excess oil that's been spilled on your engine block or surround components. Once again but for the final time, it's time to lower your car down off of its jack and axle stand(s), you can now also remove the wheel chocks.
Time to fill your engine with oil, so remove the top engine oil cap and grab your funnel, the funnel will really cut down on mess. Before you start pouring remove the dip stick and give it a quick wipe so you don't get any false readings.
The first part of the fill you will be able to put about 3 to 3.5 litres* in one go, keep adding oil and checking the level by using the dip stick. Once you have filled the engine to the correct amount (see markers on dip stick, normally the top mark is full) then replace the top engine oil cap and run the engine for a couple of minutes, this will flow the oil around all of the components / cavities inside the block, then wait a few more minutes, this allows oil to drain back to a resting position, re check oil levels with the dip stick and add more oil if necessary.
* Some modern / small cc engine only take a small amount of oil so please use this statement as a guide only
So you're pretty much done, not much left to do here apart from let your vehicle run while you pack away and clear tools up, while your vehicles running keep checking for any leaks from the oil filter and sump plug.
If you notice any leaks then turn your engine off immediately, let the car cool is necessary, and tighten the leaking item, if leaking persists then remove sump / filter and check O rings or washers for incorrect fitment. Once the leak is fixed remember to check oil levels.
Important: Always dispose of used engine oil and oil filters responsibly.